Fishy Friday

Ok, so it is that time of the year again. The air is cool and crisp, in fact winter was just extended. The beads and masks are out. The Saints are march and the bands are playing. The cops are right around the corner and we just got “Fat” on Tuesday–it’s Mardi Gras time!!! Which in turn also singles the beginning of Lent.

Now most of us, know the history and the purpose of lent. Although, over the years Lent has been changed to giving up beef on Fridays. Thus fish Fridays was born. Now just because it is Fish Friday, it does not mean it has to be plan or boring, nor does it have to be a Clam Chowder or Fish’n’Chips. A Fish Friday can be and should be fun and exciting. There is a whole ocean of fish out there — explore the world of possibilities.

This story is about one fish that is great, and if your not careful it will swim on by. As with most fish, this fish in-particular is great seared, baked, grilled and (my personal favorite) crusted. Ok, this fish is not crusted, but hey we can’t always have what we want. However, this fish is fresh and vibrant, it is also a little different (which is the way I like it and want it).

Being the West Coast kid that I am, I usually bring most of my fish in from the Pacific. That is not to say that Atlantic Seafood is inferior; but, it is to say that fresher is better. You should always choose your seafood based on your location. As with housing, Seafood is all about location, location, location. Most seafood is already caught miles off the coast; and would it still be the freshest if it had to travel to another coast? Plainly, the closer to source you can acquire something, be it meat, veg or seafood, the better it will be.

Today’s fish is brought to you by the Fiji Islands and the letter E. T letter E is for Escolar, and not to be confused with Escarole (which is a beautiful green and a different story). Escolar is firm white fish. In fact, it is also known as a “White Tuna” at times. Escolar has a slightly buttery, rich flavor. Due to it’s natural flavor, Escolar holds up really well to spiciness; chili powder, cumin seeds, cilantro rub, jalapeños and other chilies are just a few examples of some spicy possibilities.

For all the positives of Escolar, there is one draw back. Escolar is considered a “fatty fish.” Most times, fatty fish will refer how it feels on your palate and how it will react with side dishes. To some degree, Escolar is no different, and yet still different. It is recommended not to eat more than 5-6 oz at a given time. There is a possibility of reeking havoc on your digestive system when eating more than 6oz at one time (unlike other “fatty fish”). Even though it sounds small, it is not. There is plenty of flavor to make up for the missing ounces on your pate; not to mention a standard fish portion is only about 7-8oz.

Again, for this fish, I did a quick play on various accompaniments as well as serving the fish in a non-traditional fashion; with Mashed Potatoes. Some may say that fish should not be served with mashed potatoes.

Why?

Some believe that a Mash is too heavy as well as too fatty that would over power fish. Mashed Potatoes are a great side and not just for beef. In my humble opinion, it is Mash Potatoes for all. Keep two things in mind though, the size of potato portion should be smaller than the size of the protein on the plate; and the type of fish will determine if it can handle mashed potatoes (lighter, flaker fish will less likely hold up).

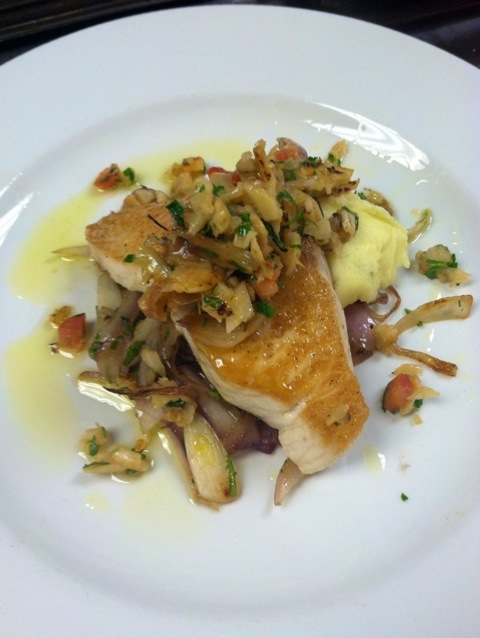
Instead of a standard sauce, I finished the fish with a nice relish–a Fennel Bruschetta to be exact. Then the main ingredient of a standard Bruschetta is tomato; sub out tomato for Fennel and thus a Fennel Bruschetta is born. This will add a bit of citrus tones, and anise flavors (both of witch pair extremely well with fish). Relishes are a great way to complement fish with out overwhelming the fish–healthier too.

20130220-152957.jpg

Escolar
4 pieces 5-6oz Escolar
salt/pepper

Fennel Bruschetta
1 each fennel
1 each lemon zest
1 each roma tomato
2 each garlic cloves
1/2 bunch parsley
1 tbsp olive oil
salt/pepper

Caramelized Cilantro Onions
1 each Red Onion
1/2 bunch Cilantro
salt/pepper

relish:
1. cut the top of the fennel off, followed with cutting it in half and coring.
2. Medium dice and sauté in a hot sauté pan, with a little oil till tender. set aside and let cool.
dice tomato and add to a bowl, then add zest, minced garlic and chopped parsley.
3. when cool, add fennel and mix. season with salt, pepper and oil. set aside.

Onions:
1. Slice onions thin.
2. sauté onions in a hot skillet with a touch of oil till tender and rich, warm brown.
3. pull from heat and season cilantro, salt and pepper.

Fish:
1. season both sides of the fish with salt and pepper
2. cook the fish in a skillet on medium heat, about 3-4 mins on each side…depending on the thickness of the fish.
3. when done the fish should be white and opaque
4. for plating- equally divide the onions to four plates. Lay of piece of fish on top of the onions, then top each fish with a spoon of the bruschetta. finally, drizzle with a bit of really good EVOO for a flavor boost.

The flavors of this dish jive extremely well together or independently. If you rather not sauté it, you can easily grill this fish. For an even more intense experience; quickly sear the fish on each side, then put every thing in a foil bag (onions-fish-relish in that order). Place the bag in the oven and roast for about 10-15 mins. No matter how you prepare the fish, don’t forget the wine!

When I think of Escolar, I taste a Sauvignon Blanc in mind. A nice wine with grassy notes and a slight citrus finish. A wine with a nice body and smooth finish. This wine screams white fish as well as “caramel” (a flavor achieved from searing food). Again, does it have to be a Sauvignon Blanc–No. Remember, wine pairing is to one’s own choosing. There is no right or wrong answer. ENJOY!

Quick: a story of bread

So the best holiday of the year has come and gone (well the second best at least). The next one coming is Thanksgiving, and most people can’t wait for that Pumpkin pie. In fact, most people wait till that one time of the year to eat pumpkin; however, pumpkin is good for more than one day and is especially good for more than being carved up. And if your anything like me, you did not even carve a pumpkin, but a drew a face on it cuz you did not want to waste the pumpkin. Which then leads to, “what do you with that pumpkin till thanksgiving comes.” Yes, we could make pie early, pie is always good (as we learned in Bite ME!!!). Although, most people will only eat pumpkin one time a year.

For a long time now we have been brought up to believe that pumpkin pie, and pumpkin for that matter, is only good for one time of the year; think of it as tradition. But being a man who questions everything, I will say WHY!? I will also challenge you to break out of that mold and belief that pumpkin can only be eaten one time a year, let alone one day of the year.

Pumpkin, is classified as a gourd, but it is also a squash. As a squash it has a pretty good shelf if properly taken care of. Pumpkins should be stored in dark cool area, doing so will allow the pumpkin to last up to about 3 months; if not longer. To be honest, I have had a pumpkin sitting on my kitchen counter since mid september and they are still looking good.

Now if your into the the sport or not, you could ‘Chunk’ your extra pumpkin just for the hell of it; not to mention the pure fun. There is always a simple, pure satisfaction destroying something for the simple fact to destroy it–but that is another *story. Pumpkins don’t have to be sweet, they can be savory too. When eating a savory pumpkin it is a pleasant surprise. You mind knows what a pumpkin is and will automatically associate it with sweet; then expect it to be sweet when tasted. Pumpkins can be used as a sautéed vegetable, in a risotto, in a puree, in a vegetable medley, the possibilities are endless when using it for a side dish.

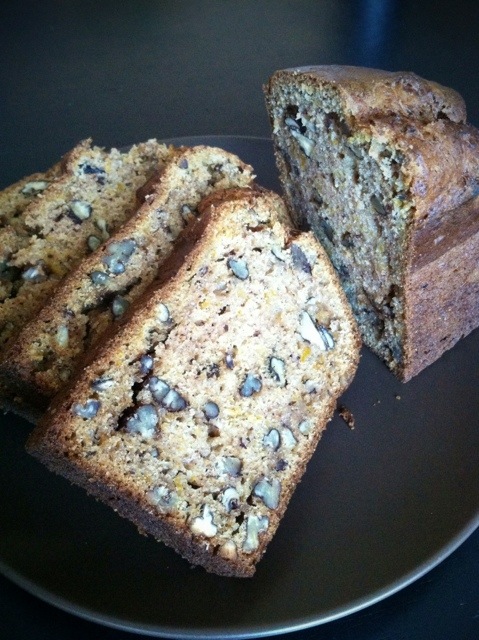
Pumpkins are more than a Jack-o-lantern. Pumpkin can also be used in the same fashion as left over old bananas–make a quick bread. This quick bread is as the name suggests–‘quick.’ There is no yeast, proofing or prolonged waiting prior to enjoying. A quick mixing of the ingredients and placed in the oven to bake. The bake time is about the same amount of time for ‘regular’ bread; but still a 1/3 of the time to make. Although pumpkin bread will require a little more prep than say banana; it is well worth it. The roasting of pumpkin can be done in advance, if not far in advance and frozen.

20121111-224942.jpg

The question will be asked, “Fresh or Canned?” It is up to each individual to answer the question “canned or fresh?” Canned will work, but my humble opinion is fresh is always better.

This bread can be used for an afternoon snack, a morning snack with tea or coffee, made into french toast, made into a serious bread pudding with more pumpkin added, warmed then topped with ice cream and caramel; once again the usage possibilities are endless. Due to how tasty this bread is, more will be made in no time; but no worries its quick.

There is more to a quick bread, than besides simply being quick. Very easily different flavors can be added or swapped. This recipe will also help teach different baking techniques; such as fat control and baking time. It is always good to pull out your baked good a touch early. Any time the oven is used, always allow for the carry over cooking factor. The Carry over cooking factor being: any food item will continue to cook once it has been removed from the heat.

It is a known fact, fat equals flavor. It is also a known fact, that some fats are good and some fats are bad. Eggs, milk, oil and butter are all classified as fat on the ingredient list and at times maybe considered as a bad fat. Where as Yogurt and Apple Sauce are good substitutions for some fats; such as standard oil. Olive oil and avocado can also be used for substitutions as well as adding additional flavors. Beside mouth feel, the main purpose of fat is to add moisture. The fat will give a soft luscious feel to the tongue. Fats can be used on individual basis or in combinations. The basic key points for fat: too much fat will cause the final product to be greasy and undesirable; while too little fat will cause the final product to be dry and still undesirable.

When making pumpkin bread, the batter should appear to be wet and pasty; however, it should not appear to be pourable like a cake mix. If the batter appears to be a little dry, try adding a bit more “fat” to achieve that desired consistency. One of the most beautiful thinks about Quick breads is the “forgiveness” it carries. Accidents will happen and sometimes these accidents will turn into great recipes. However, there is no accident/mistake as long as something is leaned from it.

Pumpkin-Pecan Bread
2 c flour
3/4 c sugar
3/4 tsp Baking Soda
1 tsp salt
1 1/2 c roasted pumpkin
1/4 c yogurt
1/3 c canola oil
1/4 tsp vanilla extract
2 c chopped pecans
1 tsp cinnamon
1/4 tsp ground ginger

1. mix all the flour, salt, baking soda, sugar (the dry ingredients) together
2. make a well in the bowl, add eggs, oil, yogurt and roasted pumpkin (the wet ingredients) to the well.
3. stir in the wet ingredients, using a spoon or firm spatula, making small circles followed with bigger and bigger circles.
4. fold in pecans and spices.
5. pour into a greased loaf pan and bake at 350 for about 45 mins or till done.
6. let cool for about 10-15 mins, then remove from loaf pan. allow to finish cooling to room, slice and ENJOY!

Can I get an extra side…2

“But I don’t want to eat them”…..”Eat your greens!”

How many times do people choose not to eat the side dish just because of what it may look like, or they are not familiar with it, or even cause it is believed to be nasty. Why don’t people like it? Who really knows; however, people should learn why and be able to explain why they dont like certain types of food. And could there be a chance it was simply not prepared properly?

Now in truth, “eat your greens” carries a lot of weight. Green vegetables have a great deal of calcium; which we all know is good for the bones and teeth. A great deal of today’s conversation is all about eating healthy. As a Chef, I try to do my part to educate as well as provide a healthier meal for people to enjoy; it is part of my culinary obligation. The easiest and fastest way to eat healthier is to eat your greens, (on top of all the other colored vegetables).

Alas the season and the time is here, it’s finally FALL! Cool nights, brisk morning, soft breezes, a warm sun, braised food, stews, risottos and vegetable purees are abound. Fall also means the time of gourds, root vegetables and winter squashes. However, Fall does not mean it is the end of green vegetables. Brussel sprouts keep the feeling of green alive. For a log time now, Brussels have carried a negative connotation about them; however, it just isn’t true. Many times people are afraid to try them because they dont know how to cook them; not to mention they look a little funny. Brussels are an easy food to cook and carry a beautiful flavor with them.

Brussel sprouts are a funny little vegetable; in fact sometimes they are referred to as baby cabbage. I mean look at them, they look like little baby cabbages. Yes, Brussels are loosely related to cabbage, but they are their own vegetable. They grow in cooler weather. They grow on pole like plants at the base of each leaf. Brussels are typically sold full grown and mature. Although, they come in one size and shape they are not subjected to be served in that shape. As with any vegetable, they don’t have to be boring or plan.

Brussels can be served whole, leaves only, shredded, or cut in half. Shredded them and use them like slaw. Their leaves can be pulled and quickly cooked. They can be cut in half and be roasted. They have a slight bitter flavor to them that play off the sweetness of other vegetables. Nuts and animal fats can greatly enhance the flavor of Brussels as well. Due to the natural bitterness of these little gems, a bit of salt will be needed to balance out the flavor.

Traditionally, Brussels are served for Christmas, but they are good all through the fall going into winter. Brussels can be the center-piece vegetable or paired along with another vegetable. When pairing Brussels, think carrots, onions, pumpkins and other squashes. Traditionally, Brussels are also boiled in salt water then sauted with a touch of butter. But again; Brussels are capable of so much more.

When doing Brussels — always, always, always add salt. The salt will soften the bitterness of the Brussels. Simply adding a pinch of kosher salt will do the trick, but a bacon product, cheese or salted nuts are also great ways to add that salt. One of the best ways to prepare a brussel is to par-boil then finish in a saute pan with some chopped hazel nuts and bacon.

Be courages, open your palate and try brussels. Try them this way then try them that way, but either way give them a chance. People should always try something at least once. In this case I went a little crazy and did multiple techniques, well simply cuz I like Brussels, and it is just damn good. Some was boiled and some were shredded. The Brussels I shredded, was turned into a warm apple slaw; while the boiled portion were caramelized. Played around and give some brussels a go.

20121104-110151.jpg

The following recipe may appear to be basic, but simple and basic is a great place to start when learning how use a new vegetable; especially when deciding the best way it should be prepared for one’s preference.

Brussel Sprouts
1/4 lb brussel sprouts
1/2 gal of water
2 tb kosher salt
1/4 butter
1/4 crushed almonds

1. bring water and salt to a boil
2. cut brussels in half, cook in boiling water till fork tender. then remove for the water.
3. melt butter in a skillet and add the sprouts. cook for about 2 mins, stirring occasionally.
4. add almonds and cook about 5 more mins.
5. season with salt and pepper and ENJOY

Very easily, the Brussels could have been tossed with some other flavors and seasonings. Brussels being as green as they are, behave very similar to asparagus when pairing with a wine. Look for white wines that have earthy undertones, grassy notes and subtle flavors. A Sauvignon Blanc as well as a Fume Blanc would both work nice. Both wines also have a hint of citrus to them; which will aide in pairing with the green vegetable. And both wines are fantastic minus the vegetables.

Splurge 2: it’s a soup!

Growing up as a kid, grandma always said, “waste not-want not.” That statement was not fully understood till I was much older. We don’t always Splurge (previous post) all the time and sometimes “splurging” is few and far between. And with any time we do splurge, we definitely want to make the most of it. One of the best ways to continue to splurge is to follow up the next day with a beautiful, rich, silky, luscious Lobster Bisque.

In this world, so many things are consider classic; the Star Wars saga, the Chevy Impala and Looney Tunes cartoons just to name a few. Food is no different; Beef Wellington, Caesar Salad and Banana’s Foster are just a few classic food dishes. Lobster Bisque is another great example of a classic dish, one problem, it is made incorrectly oh so often.

To under stand Lobster Bisque one must first understand what a Bisque really is. Bisque is a soup of French origin, which is smooth, silky and rich. Bisque is also traditionally a shellfish based soup. Now non-shellfish bisques do exist, but those usually have rice in them or they are a play on words to describing the consistency. Bisques have a very distinct viscosity to them and if they don’t – it is not a bisque, but simply some kind of other soup. Others will also try to mimic the taste of real seafood with some sort of base–that is not a bisque either, but simply salty water. That is not to say bases don’t have their place in the kitchen, but as with microwaves they need to be used correctly in the kitchen. A bisque is not something that cannot be made inside of a half an hour. This soup takes time and needs that time to develop all of its beautiful flavors. Like anything in life, anything worth while takes time.

Making Lobster Bisque does not mean busting the bank on buying expensive ingredients, followed with having them turn into mush in your soup; instead utilize what has already been purchased. As much as professional and home cooks alike will use animal bones to make stock, the same can be done with left over shells of shellfish. The shells of clams, mussels, shrimp and lobster all have the flavor of the animal they once housed. All of these shells can be combined at once or be frozen and used on individual basis.These shells do not necessarily just have to be used to make soup. A simple but highly effective and flavorful broth can be made; which can be used later for soup, rice or poaching liquid.

Although soup is a very humble course, it does not mean it does not require special attention. Quality ingredients and quality love should go into everything that is made. A good bisque requires very little work, but ample amounts of time. Making soups, sauces or broths from shells is a good way to spend money once; but eat really nice for a second time. The next time you splurge a lil’ and have shellfish, save your shells. Remember, “waste not-want not.” Combine them with some flavoring components, some liquids and then let time do its thing. The soup can be served right away or at a later time. Due to the smooth consistency of the bisque it can also be used as a sauce for another protein; such as chicken. This bisque also allows for simple modifications to one’s own desires.

Again although soup is a very humble course, it does not mean it cannot carry its own wine; there is a wine for every time and every dish. In this case one just needs to take into consideration the boldness of the flavors as well as the richness of the dish. Fume Blanc is a beautiful blend of Sauvignon Blanc and Semillon. This blend is aged in french oak. This wine is smooth with a bit of complexity to it. It has a soft open with a luscious mouth feel, which is capable of handling the richness of the bisque. This wine has a wonderful bouquet with a hint of sweetness. The taste is very appealing with out be over lingering or being forgettable. And very similar to good wine, if made properly, the Lobster Bisque will be unforgettable.

20121007-090053.jpg

lobster Bisque
2 shells of lobster tails
1 each onion
1 carrot
2 stalks of celery
2 each bay leaves
1/4 bunch thyme
1 tb peppercorns
1/4 bunch parsley stems
1 cup tomato paste
1 cup v8
2 gals water
1 cup cream

1. rough cut celery, carrots and onions.
2. in a large pot with a touch of oil, saute vegetables with herbs/spices till tender.
3. add lobster shells and tomato paste. stir then continue to cook till paste starts to brown.
4. add tomato juice and bring to a boil.
5. add water and return to a boil, then turn the flame down to low. let the soup cook on a simmer for about 3 hours or till reduced by half.
6. drain off and reserve liquid, using a fine wire mesh then throw everything else away. return liquid back to the pot.
7. add cream and then reduce on low again. cook for about another hour or till reduced by half. strain if desired, but you should not have to. top off with a dollop of creme fracihe or even bits of lobster (if any are left). ENJOY

Season the bisque with salt and pepper, but taste it first. The peppercorns, the natural salt from the shells and constant reduction should be enough to season the bisque nicely. If so desired, you can add brandy or white wine for a little added flavor. One could also add different shells from other shellfish. Adding other shells will deepen the flavors of the bisque. Remember, soup recipes (for the most) part are just simple guide lines. When making a soup, just as making anything, it is personal preference and desires are key. The goal of a bisque — any soup for that matter — is a harmonious, balance of flavors.

Splurge a Little!

Let’s be honest, it’s nice to splurge every once in a while and treat ourselves to something. Some like clothes, some like jewels, some like cars and others love high quality proteins! I myself I love to eat. Sometimes I need to kick the kids out of the house so I can splurge; and my wife loves it when I do. Most times my wife does not get to eat what is I prepare for others; it is one of biggest down falls of being married to a chef. The goal is to receive great service and great food (hell I am one of those who provide that great food). However, that is not to say you have to go out every time you crave a high quality ingredient (but please continue to do so–I love my job).

Nothing says high quality ingredient like lobster, even though lobsters can’t even speak. In truth, long ago lobster were a by product and not sought after as they are today. Followed with, Lobsters are bottom dwellers. What does it mean to be a bottom dweller? Well basically in short, bottom dwellers eat what every they can find or will fall on their head, scavengers is the word that comes to mind. As the same as with cattle, no one really knows how long they will live–they are ate prior to old age; however, they will continue to gain weight and increase in size. All of this being said, none of it negates the fact they are just so damn tasty. Although tasty, Lobster just needs to be cooked properly (as with any food item).

For the most part all lobsters are the same, but they are not created equal. Some lobsters don’t even have claws, but for the most part Lobsters come in two classes; warm water and cold water. Warm water being from places like California, Australian and the Caribbean. While cold water being from places like North Eastern United States and Canada; better known as Maine Lobster. Yes I know Maine is not a part of Canada, but the same type of Lobster grows in the same area and that particular Lobster has come to be known as Maine Lobster. Now depending on the area in which you grew up, or where you first ate Lobster will usually determine which Lobster you prefer. Warm water Lobsters are bigger and tend to be a little tougher. Cold water Lobsters are a little smaller and tend to shrink up more when cooked. Warm water Lobsters have a meater, juicer flavor which is almost buttery. They are luscious and full flavor. While the cold ones seem to be a little sweeter.

I am a West Coast kid, so it is just a little obvious where I stand. Again though, there is no right or wrong just simply better and best which directly goes along with one’s preference. Which ever Lobster that is chosen just ensure to show it the proper attention. Contrary to popular belief, Lobster does not always have to be boiled. In fact, some of the best Lobster is grilled. Yes, boiled Lobster is a little more full-proof; however, cooking Lobster out of the shell and outside of a pot of boiling water allows you to introduce other flavors. When cooking Lobster outside of boiling water, remember to still emphasize the natural flavor of the Lobster.

In today’s world Lobster is pretty prevalent outside of a restaurant. When shopping for Lobster, look for size and look on the label for region of origin. The region of origin will tell you if the Lobster is cold water or warm water and chances are the Lobster will be frozen when purchased. Currently, Lobster prices are pretty reasonable with the recent glut (the glut referring to an abundance of Lobster from the warmer then usual water).

LOBSTER DINNER

Lobster
2 each warm water Lobsters
salt
pepper
paprika
1 tbsp butter

1. safely thaw lobsters. using a pair of scissors cut the top of the shell open.
2. laying the lobster on its side, carefully crush the lobster to break the bottom of the shell.
3. open the shell and loosen the lobster from the inside of the shell. pull out lobster, leaving the very end of the tail section attached.
4. using a knife, cut a slit on top the lobster-each side of the lobster lengthwise. the slit should be about 1/4 inch deep.
5. season top and bottom with salt and pepper, then sprinkle paprika of the top of the lobster
6. spray the top of the BBQ with pan coating and lay the lobster top side down first over medium heat.

20120923-081415.jpg

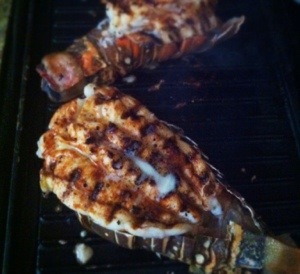
Now, in regards to the shell. Leaving the shell attached during cooking, will help to intensify the flavor and prevent drying out; not to mention it looks good during presentation.

7. cook on the one side for about 5-6 mins. flip over to cook other side. you will have to flip the shell out of the way to do so. continue to cook for another 5-6 mins (depending on the thickness of the tell.
8. while cooking the bottom, place a 1/2 tbsp of butter on the top of the lobster
9. when done, let rest for about 3 mins and ENJOY.

Side
1 bunch asparagus
8 each cherry tomatoes
1/2 tsp minced garlic
oil
salt
pepper

1. cut the woodie end of the asparagus off, the bottom 1.5 inches or so
2. cut the asparagus in half and blanch
3. cut the tomatoes in half and reserve
4.in a hot skillet over medium heat, add some oil and garlic. stir garlic to prevent burning.
when garlic is tender add asparagus and tomatoes. stirring to prevent burning. cook till the tomatoes start to ‘color’ roughly 5 mins. season with salt and pepper

20120923-082018.jpg

The other white meat?

As it seems, Summer is doing everything it can do to hold on, and at times it feels like it is using a death grip to do so, too. The daylight may be dwindling, but the temperatures continue to soar. And so while the temperatures continue to soar, the BBQs be ablaze. C’mon be truthful, it is just not time yet for a homemade soup, a stew, a casserole, or any “warm” fall/winter dish (don’t worry the time is coming and so are the recipes).

So for now, it is continued backyard BBQ cooking. There are many things in this world that are synonymous with summer and food. Zucchini, Stone Fruit, Green Beans, Tomatoes, Watermelon to start. There are also classic dishes and proteins that are synonymous with the summer; gazpacho, fish and the almighty pork just to name a few.

Ahhhh, the almighty pork…”the other white meat”….is it really “white” meat? A good pig, such as a Berkshire or other “black” pigs, the meat is almost red. This red color comes from large in part the lifestyle the pig lived ; to say it the least it was pampered and was able to exercise. Just as with beef, oxygenated meat is red; and red meat is also a more flavorful meat. In fact, natural, domestic pigs has red meat too. Over the years pigs have been bread for their yield. The problem associated with this yield, is pig farmers have lost that red color and flavor. Be it a domestic pig or a heritage pig, because of it’s natural, inherent “red meat” it can be prepared like beef. With out a doubt, pork should not be cooked above a Medium temperature. Pork’s natural flavors are best emphasized when served medium.

Pork is an extremely versatile ingredient with its applications ranging from marinades to cooking techniques. Dry rub it, soak in a soy marinate, brine it, roast it, braise it, smoke it, cure it, plug it, stuff it, slap some mustard on it or simply exemplify the natural flavors with salt and pepper. When it comes to pork and to dinner, don’t limit one’s self, dream big and reach for the stars.

Go big or go home can be said, but be careful going to big with what ever is being prepared. The worst thing in the world is to go so big, the main ingredient is lost and the final dish is muddled. Try to think of and pair ingredients which complement each other. As once said, “if it grows together it goes together.” When it comes to protein, remember an old ancient proverb, “you are what you eat.”

In this particular case, I chose a beautiful Berkshire Pork rack that was simply cut into one bone chops. Followed with a nice Porcini Rub; pigs love to eat mushrooms. And because my wife would kill me if I heated the house in any way, it was cooked outside on the BBQ. Finally I chose a beautiful Petit Verdot. The Petit Verdot has a medium body and light tannins. It has a sense of earthiness which pairs extremely well with the pork and mushroom. One of the greatest attributes of the Petit Verdot, is its nice open followed with a non over-lingering finish.

Porcini Pork Chop
4 each pork chops
1 cup dried porcini mushrooms
1 bunch thyme
2 tbsp kosher salt
1 tbsp black pepper
4 each tomatoes
handful of spinach

1. break the stems off the porcinis
place the porcinis into a spice grinder, coffee grinder or blender and blitz. the porcinis will be turned into a powder. The container (grinding cup) will have to be shaken up every so often to prevent clumpy and even grinding. dump powder into a mixing bowl.
2. strip fresh thyme leafs from sprigs then add them to bowl with porcini powder. followed with adding the salt and pepper and mix thoroughly.
3. Rub the pork chops liberally with the porcini spice rub, then let the pork sit for about 10 mins prior to cooking. Save the remaining porcini spice for future cooking applications.
4. cut tomatoes in half and season with salt and pepper.
5. cook your pork on the BBQ or in a Cast Iron skillet. cook for about 5-7 mins on each side, depending on the thickness of the chop. The pork should be cooked medium (a touch of pink), just as one would do with beef.
6. add the tomato, cut side down, to the skillet or BBQ at the same time the pork is added. cook the tomato along side the pork; however, for only about 3-4.
7. while the pork is resting (for about 5 mins), slightly wilt the spinach in a hot skillet.
8. add a touch of oil to a hot skillet, add the spinach along with a sprinkle of salt and pepper. remove the pan from the heat once the spinach has been added and stir around to quickly wilt.
9. place spinach on a plate, top with pork and serve along side roasted tomato and ENJOY.

20120916-082014.jpg

The addition of the spinach and tomato is not a necessity; however, they complement the Petit Verdot as well as the pork. The addition of the two sides completes the ensemble, they also keep the dish healthy and light. Both of which are extremely good, especially in the summer time; again though, it does not have to be spinach and tomatoes to be healthy and light. Listen to what the body is craving and eat what the body desires; in summer time (while it lasts) the possibilities are endless!

Catch of the Day

Ok, labor day has come and gone, but is it still summer? Technically summer is over, vacations are done, everyone is back to school and back to work. Actually though, summer does not end till the middle of september; so says the calendar. Now let’s take a brief moment and step outside, yeah that’s right it’s still hot and muggy! Hot and muggy translates into summer time for me and just like ever one else I hate using the oven, eating braised items, and heavy courses in the summer time. However, I do enjoy a light, fresh, crisp food when it is hot out and when dinner time comes I think of fish. Now yes, fish is good all times of the year, but especially good during the hot season. Fish tend to follow the warmer waters, and being able to procure a fish locally that may be hours old versus days old or even frozen; well there is no question on which to choose.

Being a west coast boy, there is a plethora of local fresh fish. Black Cod, Halibut, Sea Bass just to name a few. All of these are terrific tasting and lend themselves to various cooking styles, not to mention to California wines. When it is time for dinner it is always best to choose your fish, then cooking style, followed by the wine.

Remember, every fish will perform differently when cooked. Some fish will remain firm, while others will flake apart. Cooking techniques will not only effect the texture of the fish, but it will also effect the over-all flavor of the fish. Grilled fish will pick up a
Little smoke flavor, roasted fish will help intensify flavors, while fried fish will have some oil flavor as well as the flavor from the breading. Finally, the wine will be effected by everything on the plate, but keep in mind to bring the plate to the wine–you can change the plate but you can not change the wine. Taking everything into consideration, if you desire to serve a chard, make sure and prepare your fish to meet the needs of the chard.

Not only is fish (especially local fish) versatile in cooking, it is versatile with its flavor applications. Being a man of South Western roots, I crave a good, proper South Western dish. Just to clarify, proper South Western food should be bold and flavorful. The spice of the dish should enhance the over all plate and the spices themselves should “get” you in the back of the throat. If the spice over powers the entire dish, it is not proper South Western — but that is a whole another post entirely.

This particular recipe was done for a special on a Friday night (fish Friday, it’s a catholic thing), and sold out inside of a 1 1/2 hours. In this case; I chose local Halibut, combined it with chipotle, various different cooking techniques, and finally paired it with a riesling.

Chipotle Halibut

2 lbs halibut
1/2 can chipotle
1 lb butter at room temp
1 cup of panko(bread crumbs)
1/4 bunch of parsley
Salt/pepper
Oil

Papaya salsa

1 each papaya
1/2 bunch of chives
4 each cherry tomatoes
1/4 bunch cilantro
Drizzle of EVOO

For salsa:
1. Seed and peel papaya. Small dice and add to a mixing bowl.
2. Slice tomatoes in half, add to the papaya
3. Slice chives, and mince cilantro then add to bowl.
4. Season with oil, salt, pepper and mix gently. Leave at room temp and set aside for later.

For fish:
1. Place the chipotle in a blender and purée, then stir into butter with a spoon or place butter and chipotle in a food processor, then process till smooth. Reserve for later.
2.Chop parsley and mix with panko (or bread crumbs), then reserve for later.
3. Cut halibut into about 8 oz portions, trim off any unedible pieces.
4. Heat up a skillet over medium heat
5. Season fish with salt and pepper, both sides, then brush one side with butter. Give the fish a good coat of butter to the one side.
6. Dip the side with butter into the panko mix. When you lift the fish out of the breading ensure it is coated well.
7. Add a touch of oil to the skillet, add the fish to the skillet breaded side down first. The fish should immediately start to sizzle; careful, make sure to manage the heat as not to burn the breading. A medium high flame should work just fine, but again may need to be adjusted.
8. Cook the fish for about 3-4 mins on each side, depending on the thickness of the filet. Use a spatula rather than a set of tongs to flip the fish over, this gives the fish the support it needs during movement.
9. When done, lay the fish on a plate along with your favorite sides. Top the fish with some of the Papaya salsa and ENJOY!

20120907-092725.jpg

Now at this time let’s return back to the wine. As mentioned before, this dish will pair beautifully with a riesling. Yes I have paired previous recipes with Riesling and no it is not my favorite; it’s my wife’s (so I tend to show it a little favoritism). However, in my opinion riesling is a “strong” wine capable of handling some many different types of food. It is especially capable of handling spicy food as well as fruit. Riesling carries a little citrus, slight sweet as well as being low in tannins. It possesses a good balance – beginning, middle and finish. Not only is it a great drinking wine, but it is an absolutely great wine to pair with your meal; but hey, you don’t need to take my word for it just ask my wife.

20120710-100347.jpg

Bite me!!!

Pie! And not Pi as in 3.14, but as in the edible, delicious everyone craves pie. It seems everything is about pie these days. Frozen pies, fresh pies, pies on the go (pasties) sweet pies, savory pies and even deconstructed pies. Pies are starting to become like a fine wine; there is one for every time and every occasion–then again maybe it has always been that way, we just never really noticed.

All of us at one time or another have had bad pie, good pie and GREAT PIE! For myself, my first GREAT pie was when I was a little kid and it was a family holiday party. Now in my family, my aunt always made the best desserts. Some were ones she just made up and others were classics. Over the years she become known for her Pecan Pie, an old southern classic. In fact, at times she would just say, “and no I am not making Pecan Pie,” when ever the family dinner invites would go out. In those days she was the expert on pies and desserts…

“Then I was but the student, now I am the master” ~ Darth Vader

Lately it has become a virtual grudge match between my aunt and I; on who can make the best dessert let alone pie.

Needless to say, but Pecan Pie is tops!

Growing up, my aunt never showed me all of her trade secrets or her recipes for that matter. I fondly remember the day we learned how to make Pecan Pie in culinary school; I was front row, I made sure to made and TASTED everyone! “Excuse me Chef?,” I asked. “at what time would you add brandy to the pie” “Umm, why would you add brandy to a Pecan Pie Jason?,” asked my chef instructor. “Well my aunt always puts Brandy in her Pecan Pie,” I replied. “Ya, Jason…sounds like your aunt is an alcoholic.” Since that time I have learned when to add Brandy and have been doing it every since. And yes, to answer the question, my aunt is an alcoholic.

Through out the years I have also picked up some other extra tricks to enhance my Pecan Pie. One of those tricks was to marry my pie with chocolate. I am not sure who was the first to marry chocolate and Pecan Pie, but absolutely genius! Some will add chocolate right into the mix and others to the top, like a coating. If you add it in, either you will have to melt the chocolate and add; or you will add raw chips and take a chance of a “broken” filling. In my opinion, adding chocolate to the mix is not always the best way to go. Finishing the pie with ganache, once it is baked, is the best way to go; by doing so will add a touch of richness to the dish and gives you the option to choose slice by slice; Chocolate or not to chocolate! Lets face it Pecan Pie is just damn good either way you slice it.

Now it is almost that time of “seasonal pies” such as Pecan Pie, but I ask you, “Is there ever a time when it is not a good time for Pecan Pie?” Remember, even though Pecan Pie was created in the South, it is not just for a “Southern Man.” Pecan Pie is for everyone and every time; with or without chocolate. In fact, it took me more time to write this recipe then eat the pie!

There is never a bad time to enjoy your Pecan pie; however, I strongly recommend serving it at room temp. Due to the custard like base, heating it up prior to eating or eating while still hot will leave you with a gooey mess; “and that’s not good eats,” ~ AB

Brandy Pecan Pie w/ Chocolate

pie dough
4 oz butter
6 oz flour
1 tbsp sugar
pinch of salt (kosher)
water as needed

1. cut butter into the flour, salt and sugar. use your hands or two knives. When done the flour mixture should be about pea size pellets.
2. With 1 tbsp at a time, mix in ice water into the flour mixture (using your hand), just till a dough forms.
3. let rest in the cooler for about 20 mins or till pecan mixture is made.

let’s not forget, pie crust is key and everything to a good pie. Pie crust will make or break a pie; the same as quality bread will make a sandwich (but that is another post). When every possible make your own crust. Pie dough will last in the cooler for about 3 days or better yet it will last in the freezer for about 6 months.

pecan filling
4 oz brown sugar
2 oz butter
2 each eggs
1 3/4 cup light corn syrup
1 shot of brandy
1 tspn vanilla
5 oz pecans

1. cream sugar and butter (notice the sugar is listed first, putting sugar in the bowl first will lessen the sticking of the butter to the bowl) in an electric mixer with a paddle attachment.
2. when butter mix is smooth, add eggs one at a time, waiting the first egg is incorporated prior to adding the next.
3. slowly add brandy and vanilla while the mixer is still on.
4. add the corn syrup and mix till fully incorporated.
5. remove dough from cooler and roll on a floured work surface to about 1/4″ thick and just slightly bigger than a 9″ pie tin (about 12 inches in diameter should work). remember when rolling out pie dough, make sure your rolling pin and work surface are floured, just not over floured. First roll away then towards yourself while applying pressure; then rotate 90 degrees and repeat till desired thickness is reached.
6. gently roll the dough around the rolling pin, place the rolling pin on the edge of the tin and unroll over the tin. Tuck the dough down into the tin, cut off any access dough.
7. line the bottom of the dough with pecans then cover with filling.
8. bake at 400 degrees for 15 mins. turn oven down and bake at 325 for about 30 mins. the pie should be slightly cracked on top and a “firm giggle” like a jello mold when fully baked. let cool to room temp.

20120831-100720.jpg

ganache
4oz chocolate (by weight)
4oz cream (by weight)

1. bring cream to boil, careful not boil over the pan.
2. if not using chips, break chocolate into pieces
3. place chocolate in bowl, big enough to hold cream and chocolate, pour cream over chocolate and let sit for about 2-3 mins. If you choose you can add about 1 tbsp of butter (this will help the sheen of the ganache once fully cooled).
4. stir till completely smooth and pour an even layer over the top the of Pecan Pie.
5. let cool to room temp, then place in the cooler for about 1 hour (this helps with un-molding.
6. to un-mold, use a butter knife and loosen the pie away from edges. place a plate on top and flip over, remove pie tin. place another plate on top of pie, using two hands (one hand on the bottom plate and one on the top) flip the pie upright. remove top plate.

20120831-101148.jpg

slice and ENJOY!

20120831-101444.jpg

No cooking required

Okay, it’s HOT, DAM HOT! And to quote Robin Williams “It’s so damn hot a person in orange burst into flames. In fact, we are doing some “crotch-pot” cooking down here,”~ Good Morning Vietnam. Of course it’s hot, it’s the summertime for heaven’s sake. Now nothing says summertime like a nice fresh bowl of cool ice cream. I know everyone is looking for an Ice cream recipe or maybe a SemiFreddo…

TIME OUT!

Rick Bakas already has my lemon Semifreddo recipe, and it’s a a damn good one too. Check it out at backbakas.com

TIME IN!!

Let’s remember: there is more to summer than the perfect frozen concoction. Gardens are bursting and farmers’ markets are abound with great vegetables: zucchini, tomatoes, cucumbers, green beans, corn. Many times people feel all these vegetables need to be grilled since it is the grilling season; however, this is not always true. In fact, a lot of these vegetables are great raw and are extremely versatile. Not to mention it is always good to diversify what we eat and how we eat it (but that is a later post). Lastly, raw vegetables retain more of the components that make them healthy.

Vegetables are versatile. They are so much more than a side dish; they can slated as a the focal point or be great as a snack. My opinion? Vegetables can be considered a “magical” ingredient that is often overlooked. Often vegetables are thought of as boring, but when vegetables are mixed together with other vegetables and “jazzed” up they become far from boring.

“What vegetables go together?” can be asked and there is a proverb that can be said in answer – “if it grows together, it pairs together”

A recipe with “no cooking required” is priceless in the summertime. Again, it’s HOT! Why would you want to cook and heat up the house. My wife, especially, is one of the ones who hates the heat and cooking in the summertime. Like many of my recipes I have posted thus far, this one was also inspired by my wife; rather created for my wife. This recipe was also a great way for me to utilize the the hoard of tomatoes from my garden.

Tomato-Cucumber Salad

10 each Cherry Tomatoes
1 each Cucumber
2 tp EV olive oil
1 tb white balsamic
1/4 cup Shredded Parm
salt
cracked pepper

1. cut tomatoes in half
2. cut the ends of the cucumber and quarter length wise, then slice into 1/2″ chunks
3. mix all ingredients together in a bowl and season with salt and pepper. ENJOY

20120825-095148.jpg

As my kids like to say, “Easy, peasy, quick and easy.” As I mentioned before, this is great for an afternoon snack or a side for a lunch. A simple adaption would be add some arugula or spinach for a full size salad. Or take it to the next level and top it with some grilled chicken or seafood (shrimp or scallops would work best but a filet of fish would be good too) for an entree salad. And after my wife finishes editing this post I know what I will be making for dinner! How about you?

Lastly, “what about the wine?” Wine is always good. There is ever rarely an occasion when wine can not be served. For this recipe I recommend a lighter white, but something capable of holding up to the acidity of the dish. A glass of Rousanne would fit the bill nicely. A Rousanne has a floral nose and it has a subtle opening with a good finish. Some might say it is very similar to a Chardonnay, but without the oak and tannins; it has an almost buttery feel on the palate. It is a lovely wine that pairs easily with this recipe, as well as many other foods. Remember, there is no right or wrong in wine pairing, just better and best. Happy non-cooking and drinking!

A peace offering

Food is used the world over for more than substance. It is used to teach. It is used to heal as well as to poison. It is used fight guilt, depression and has even been used to start a war. It has created grudges and bonds. It creates Nirvana and bliss. It is used to showcase passion as well as incite passion. It his used as an art medium. It is used to sell just as much as sex – after all food is sexy! Most of all it is a peace offering.

20120710-105340.jpg

We all know that “music soothes the savage beast” and “the pen is mightier than the sword.” So of course we know that “the way to a man’s heart is through his stomach!” Sometimes the only way to create peace is to get to the heart through the stomach. When you have individuals going at each other, sometimes only a culinary peace offering will do; and when you have ‘spicy’ individuals, no ordinary peace offering will do, it must be an equally ‘spicy’ offering! I’ve created this Red Curry Chicken as a virtual peace offering for the Spicy Quartet (you know who you are).

To clarify, spicy food does not always have to burn your lips. Spicy food can have some heat to it, but more over spicy is a FLAVOR adjective. I like to equate spicy to a woman: just as my 7-year-old son once said, “Women like spicy cause they are HOT!” Spicy means bold, beautiful, flavorful, and if your not careful its flavor will come back and smack you in the FACE! Spicy flavor is intense and is more than meets the eye. Spicy flavors are complex and simple at once; while evoking passion; again, much like a woman. Spicy flavors also have many different levels of heat to it. Spicy flavors are not solely associated with a particular region or cuisine; rather spice is where the heart is. In the following case, the dish was inspired by the people of India and their curry.

To further set the record straight curry is not a dish; it is a collaboration of spices and ingredients composed into a dish. It is definitely not that neon colored canister on the store shelf. Curries will vary from region to region, person to person, and family to family. The best thing about a curry is it constantly evolves. Curry is extremely diverse: it can be used with chicken, vegetable, beef, seafood, sauce, etc. It can come in many different colors and degrees of spiciness. Curries are also easily adapted for the geographic area they will be used in. Curry, just like all cooking, is about preference.

20120710-105233.jpg

There is another miss conception that surrounds curries and Indian food in general. Many of us Americans believe that all Indian food is spicy, too hot to handle. We have been mislead about a great deal of International cuisines. We sample a bit and derive our entire view of the cuisine from that one bite. There is more to Italy than pasta; there is more to Mexico than tacos; and there is far more to England than boiled food. India is no different. Flavor is sovereign in international cuisine.

If it does not taste good (FAN-DAMN-TASTIC), why waste the calories?
Just like so many others, I HATE WASTING CALORIES!

I prefer my curry on the low side of the heat scale while still very flavorful, where just about every flavor can be picked out. As always this recipe is adaptable. More heat can be added; stronger spice profiles can be used. This is a good beginner homemade curry paste, especially for those who have always wanted to make their own. The best thing about homemade: you control what goes in it. This paste can be used as a rub (as I did), or turned into a stew, or even a sauce. Again, I don’t believe rules should be applied to food; just likes and dislikes, better and best.

Red Curry Chicken

Red Curry Paste:
2 tsp cumin seeds
2 tsp coriander seeds
1 tsp ground mustard
1 tsp paprika
4 tsp New Mexico Chili Powder
1 tsp black pepper
Juice of 1 lemon
2 tbsp olive oil
2 tsp salt
1 tsp turmeric
1 6 oz can tomato paste
6 each garlic cloves crushed
1 large knob of ginger, finely grated

1. Place cumin, coriander, mustard, paprika, chili powder, and black pepper in a sauté pan. Toast spices over a medium heat for about 1-2 min, stirring constantly to prevent burning. Toasting the spices will help to release flavors and will give a different dynamic to the spice.
2. Place the toasted spices in a spice grinder and grind to a powder.
3. In a medium size bowl mix everything together. It should form a paste.

Chicken:
2 whole chicken
Red curry paste (from above)
Olive Oil
Salt & Pepper

Spilt each chicken into four pieces:
1. Cut down the middle of the chicken, breast side first, then continue all the way down through the back bone. Cutting through the back bone will require some force. Place one hand on the front of the blade to help set the blade into the bone; then grip the handle tight and push down hard to cut through the bone.
2. Cut in between the breast and the leg to separate the two. Repeat for both chickens.
3. Rub all the chicken parts liberally with the curry paste, let set for minimum 4 hours, up to 24 hours.
4. Heat a cast iron skillet over medium heat and preheat your oven to 350. Add a touch of olive oil to the skillet, season the chicken with salt and pepper, then place skin side down. Cook for about 4 mins then flip over. Once the chicken has been flipped over, place the skillet in the oven. Cook for about 20-30 mins. (or until chicken is done).

20120710-100204.jpg

Again this curry paste can be used for many other applications, not just chicken. And though the heart of my curry lies in India, it was made to pay homage to my southwestern roots.

20120710-100016.jpg
Dinner is ready, but dinner would not be complete without a tasty beverage. The spice of a curry or any food does not limit your options to beer or water: there is always room for wine. There are some key notes to remember when pairing your curry.

~Sweetness of wine – a sweet wine will hold up to the heat of a curry better than a dry wine.
~Alcohol content of wine – higher alcohol content will also hold up better to heat of a curry.
~Spice of the curry – some spices may bring out a bitterness in some wines.
~Flavor profiles of the curry – some flavor profiles may also clash with some wines. Try to remember balance: the equivalence of boldness and complimenting notes of both.

20120710-100347.jpg

A Riesling pairs very well with the curry above. There are no conflicting notes and the citrus from both help to complete the bridge from food to wine. A Riesling has just enough sweetness to complete the equation and be a fantastic match. And if you ask my wife she will tell you that a Riesling is fantastic with or without the food (well depending how the kids are doing that day and if I am home to cook for her).